Turning a laptop into a CCTV
During the night of the 14th to the 15th of September, a glorious looking BBQ pulled pork sandwich I had put on my kitchen table was half eaten. The bite was seriously huge, think a good 100g of bread + meat. A previous accident, garbage bag being torn, suggested we might have a rodent issue in the house (or anything else really). Being curious about who (could be a sleepeating housemate!)/what the hell ate my lunch, we decided to investigate with my flatmates. No droppings and the quantity of food eaten rule out mice — or at least we think so, unless we're up against a colony of ninja mice — leaving us with rats, squirrels or stray cats: a small window was open in the kitchen, big enough for a small animal to enter.
The best way to find out what it is being actually seeing it, we decided to put some bait out and film the kitchen at night. We don't have a camera but we have webcams on our laptop. How hard could it be to create a script to take pictures with it at a set interval ? I ended up creating Rodent to solve that issue. One of my flatmates is a designer (Barbara Marcantonio, you can look at her website) and made a logo for it for fun.
![]()
Below is an explanation of how it works, this is pretty basic but that was new to me !
Installation🔗
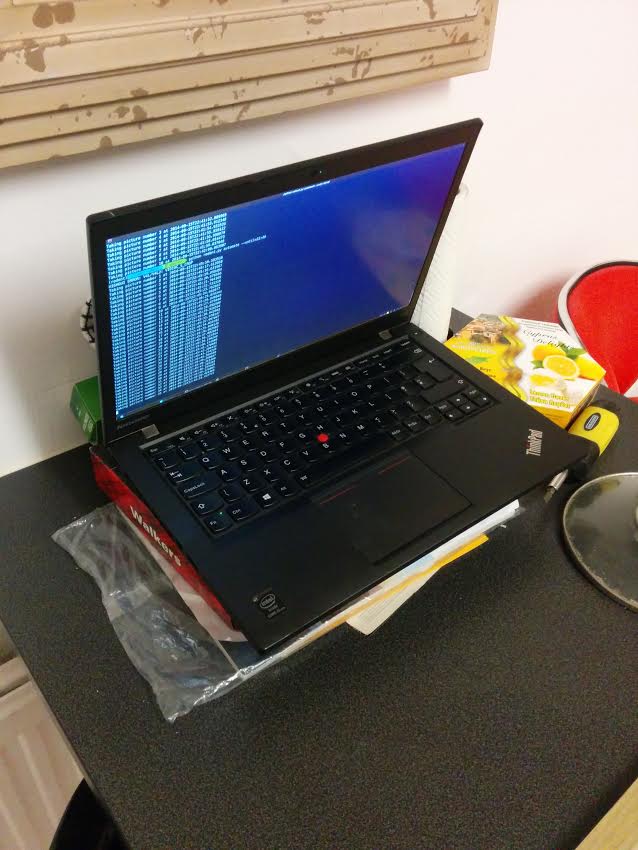
The installation is a bit tricky as it uses OpenCV and needs a few dependencies for video/images (you will need the libjpg one for the pictures at least). The setup for Ubuntu is described in the README, I haven't tried to install it on any other OS so I cannot comment on it. Here's a photo of actualy physical installation:
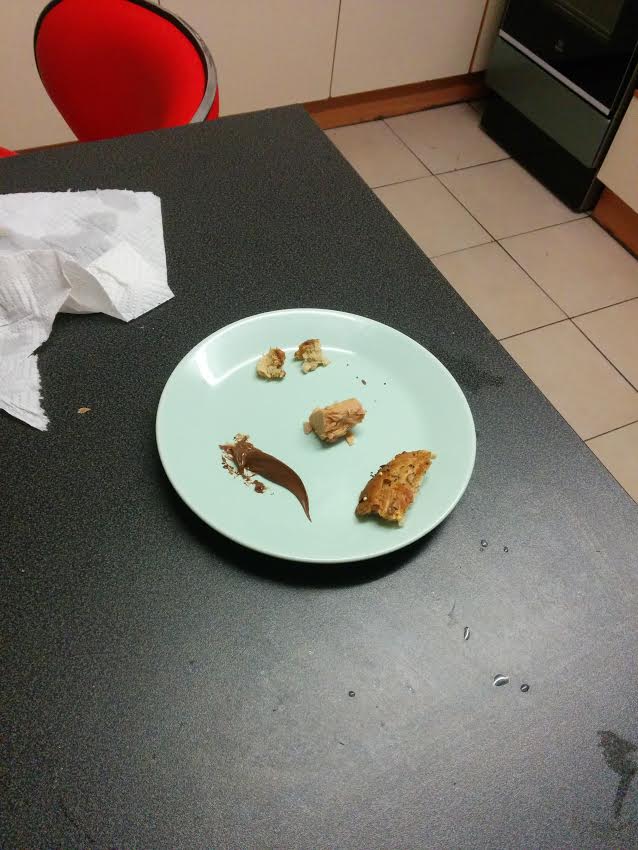
We were not sure of what we are trying to catch so the bait is pretty much a bit of everything: nutella, bread, tuna, cheese etc
API🔗
Rodent exposes 4 methods:
- capture: takes a picture from the webcam at a given
intervalforever oruntilthe time specified in thefoldergiven - make_video: takes all the pictures in the
folderand makes a video out of it, better than watching pictures! - automate: does both capture and make_video, I use it for example to record until 15 minutes before I wake up and the video will be ready by the time I get to the kitchen
- motion: takes a picture only if it detects a movement (the sexy part)
Let's get down to business🔗
The first part I did was to take pictures at a set interval. OpenCV exposes the webcam very simply:
# Get the webcam
camera = cv2.VideoCapture(0)
# Take a picture, the ignored value being the return values
_, image = camera.read()
So this gives us an image, we now need to save it, once again OpenCV makes this very easy:
filename = '%s/%s.jpg'% (folder, now)
filepath = filename
cv2.imwrite(filepath, image)
This works, but the main issue is that an image saved that way is around 64kB, which can be a lot if you take a picture every seconds for a whole day. My first try was to open the image in PIL and save it right away while lowering the quality a bit:
# Resave it with pillow to do a better compression
img = Image.open(filepath)
img.save(filepath, optimize=True, quality=80)
I realised while writing that part that I could also specify the compression directly in OpenCV and skipping PIL entirely!
filename = '%s/%s.jpg'
filepath = filename % (folder, now)
# Syntax is a bit odd but it works
cv2.imwrite(filepath, image, [cv2.cv.CV_IMWRITE_JPEG_QUALITY, 80])
This gives an image of about 21kB, 3x times lower than the original one. A pretty big save when multiplied by several thousands.
Putting it together with an interval, the code is:
# check the start_camera function in rodent.py for the full method
while True:
    _, image = camera.read()
    now = datetime.datetime.now()

    number += 1
    print 'Taking picture number %d at %s' % (number, now.isoformat())
    utils.save_image(image, folder, now)

    if utils.time_over(until, now):
        break

    time.sleep(interval)
A simple basic infinite loop that breaks on CTRL+C or if the time is over, nothing fancy.
I'll make a video out of you🔗
Once again, OpenCV provides pretty much everything needed to make a video out of the box.
# make_video in rodent.py

# Sorting on dates, ISO ftw
filenames = sorted(os.listdir(folder))

# Find out size of the pictures we're taking
first_pic = cv2.imread('%s/%s' % (folder, filenames[0]))

# shape gives a tuple (height, width, layer)
height, width, _ = first_pic.shape

# magic below, might need to change the codec for your own webcam
fourcc = cv2.cv.CV_FOURCC(*'XVID')
video = cv2.VideoWriter('output.avi', fourcc, 20, (width, height))

for filename in filenames:
    video.write(cv2.imread('%s/%s' % (folder, filename)))

video.release()
The only tricky part is to take an image to get the size of the video and the fourcc parameter which is the 4-character code for the codec, which I pretty much tried randomly until I got one that works. Right now the fps is determined completely arbitrarily depending on the number of pictures so it's highly probable that it will be too slow or too fast, simply change the value of the 3rd parameter to VideoWriter. The only issue is that it seems that OpenCV doesn't write the last few images somehow.
The motion detection🔗
Let's get to the interesting part, the motion detection. The need for that arose after the first night of the home-made CCTV: watching minutes of footage of a still background is not very interesting. Rather than taking a pic every second, how about only taking a pic only if movement is detected, that would reduce the number of pictures significantly and make looking at it less boring. Since we only care about movements, all the pictures for that part are converted to grayscale:
gray_pic = cv2.cvtColor(camera.read()[1], cv2.cv.CV_RGB2GRAY)
Algorithms🔗
The first obvious thing I tried was taking 2 pictures and doing a diff of them (again, OpenCV provides it through the absdiff method). This worked okay-ish, the main issue being having ghosts in the motion. Enter another algorithm, which I absolutely can't remember where I read about it unfortunately so I don't even know its name, which makes you compare 3 pictures instead of 2 and do a bitwise and between the 2 results. This is what I currently use but a text explanation would be boring for a computer vision program so let's walk through the code along with pictures.
How it works🔗
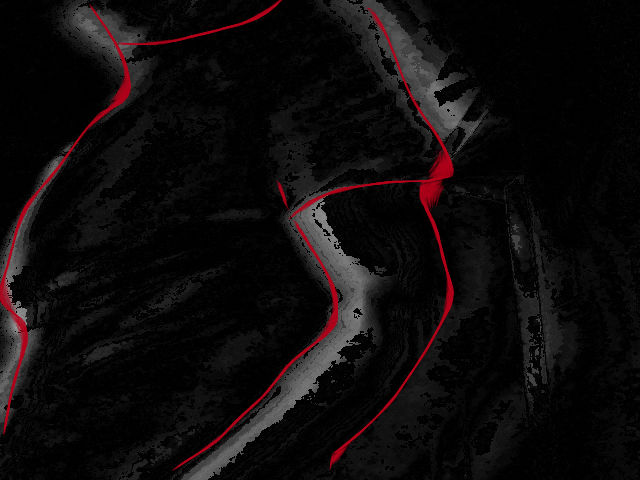
We have 3 pictures: previous, current and the loop one. We want to get the difference from the one in the loop compared to the previous and the current one.
difference1 = cv2.absdiff(previous_image, gray_image)
difference2 = cv2.absdiff(current_image, gray_image)
In practice the difference looks like the following:
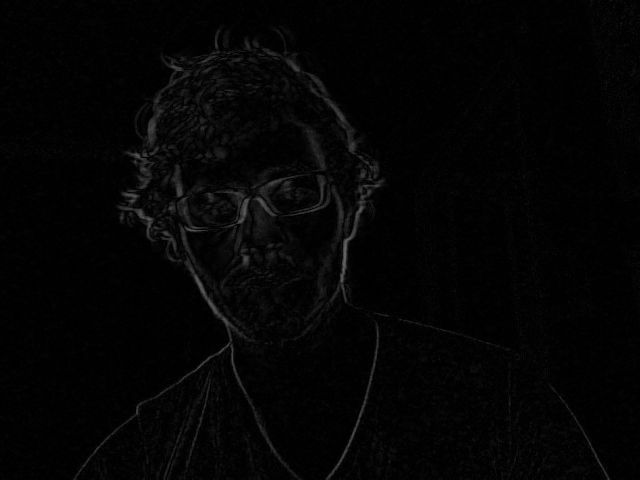
You can see my outline, with a pretty cool effect imo, as I was moving in front of the camera.
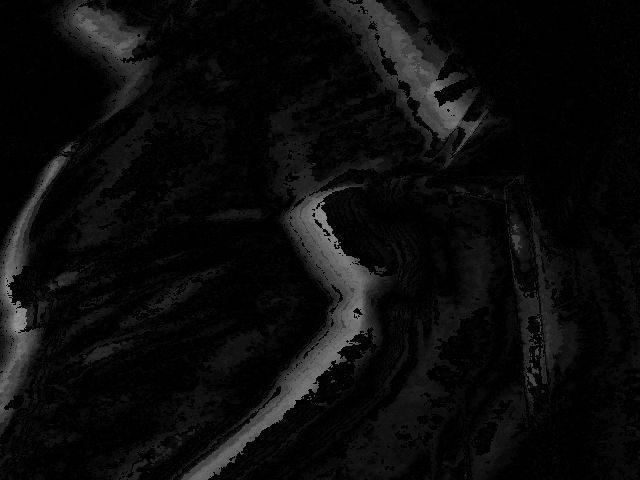
Next we want to know the if something changed in both differences, done with the OpenCV bitwise_and method.
result = cv2.bitwise_and(difference1, difference2)
This gives a result similar to the above, but usually more faint. I personally love this kind of picture, it gives a watercolour like effect. Here you can see my arm while I was standing up, a bit on profile:
To make it clearer and know what you're looking at, I tried to highlight the outline of my body:
We then want to apply a binary threshold to only get clear motions:
_, result = cv2.threshold(result, 40, 255, cv2.THRESH_BINARY)
This means that for every pixel in the result, turn those with a value above 40 (arbitrary value, seems to give good results but open to changing it!) to 255 (white). This is the picture above after the thresholding:
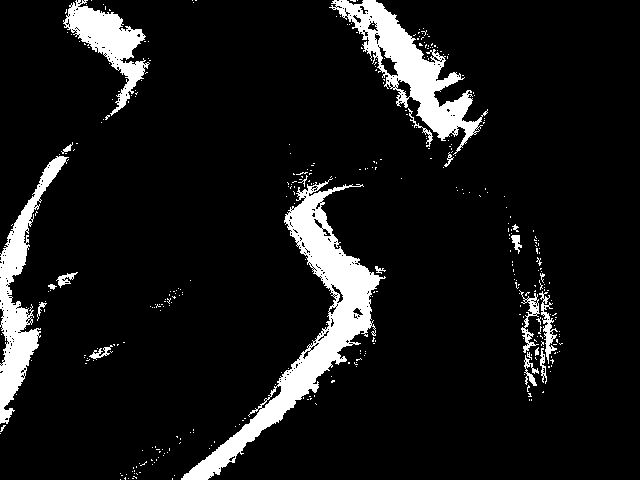
A picture after threshold with no motion would be completely black.
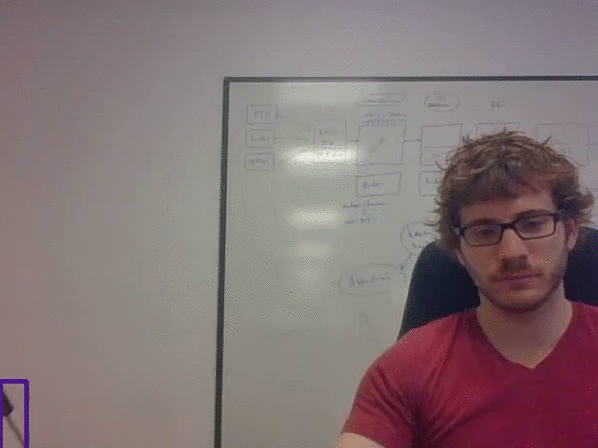
We now have an image with the areas where a motion occured in white and we only need to check if we have some pixels with a value of 255 in the image to know if there was a motion. Since we know that, we might as well highlight the area where a movement occured: Rodent does that by putting a purple rectangle around the area. The code is not that interesting and lives in utils.py/find_motion_boundaries if you want to check it out. It simply finds the lowest/highest point (X, Y) in the image with 255, becoming the coordinates for the rectangle and None if there was no motion. Adding a rectangle to an image is trivial as well:
# low_point and high_point are the (X,Y) tuple mentioned above
# purple is the colour in RGB and 3 is the thickness of the line in pixels.
cv2.rectangle(image, low_point, high_point, purple, 3)
Note that the rectangle method does the transformation in-place, it doesn't return the new image. Here's what a motion made into a video looks like:
Results🔗
We still haven't caught the culprit but Rodent has been quite fun so far ! This is the first time I'm using OpenCV and it is very powerful, the API is not very pythonic but works very well. Also, don't forget to delete the camera object because it happened to me that the webcam refused to turn on until I rebooted after a several CTRL+C, it is now handled properly by catching KeyboardInterrupt.
The space below is reserved for a picture of the culprit once we catch him.
[Insert screenshot of culprit once caught]